Latest: NCERT Make it easy! | Series: WANNA FIND ME? | EDUCATION ONLINE!

How to Add/Change Blogger Blog Favicon?

36 comments

What is favicon?

While using IE, Firefox or Opera you will see an icon on the tab when you visit a page.This is called favicon. Favicon is a small icon/picture (usually 16px x 16px in size) shown next to site URL in the address bar. In Blogger, by default orange colored blogger icon is shown as favicon which looks ugly and it is common also as lakhs of blogger blogs contain this. Also having your own favicon with a nice graphical reminder of your site beside is a good way to attract visitors attention.
As you all know, Blogger has a new feature which allows you to change your blog's favicon without HTML coding (you still can use the codes if you want though).

Add/Change Blogger Blog Favicon?

  • Log in to your Blogger's Dashboard
  • Go to the Layout
  • Click on the favicon Edit linusually present at the top left corner.


  • Now hit "Choose File" button.
  • Browse for your own image(should be less than 100 KB) and select it.
  • Blogger will automatically re-size it,and finally hit the "Save" button.
Now refresh your blog you will see your new favicon,If you can't then delete browsers cookies and caches then visit your blog.

Another Way To Change Blogger Blog Favicon

Here is another simple way to change your blog's favicon.

Go to Blogger Template>Edit Html
There find the title tag which looks like
<title><data:blog.pageTitle/></title>
and immediately after that add the following code after proper editing
<link rel="shortcut icon" href="URL of your icon file"/>

Remember to replace URL of your icon file file with your icon file's URL
Your new favicon should start appearing in some time.

Well, some blogger, have been facing some trouble with their favicons because Blogger wouldn't show them at all or wouldn't update them to the new one.

If the favicon on your Blogger blog does not update, make sure you clear all history from web browser and then check for it. 
                                             OR
If you changed your favicon on the Layout section of your blog or used the HTML code and it doesn't work or doesn't show the right favicon, just do the following steps:

Step 1: On the address bar, type http://[your blog url]/favicon.ico and press Enter.
Step 2: Refresh the page.
Step 3: Go back to your blog.

Manual method to add Favicon to Blogger blog

To get started, first you need to backup your Blogger template: Click on ‘Layout’ > ‘Edit HTML’ and then click on ‘download full template’ to save it on your computer. Now perform following steps to a change favicon in your Blogger blog:


1. Click on ‘Layout’ > ‘Edit HTML’
2. Then add following code after <head>
<link href=’http://www.URL.com/favicon.ico’ rel=’shortcut icon’/>
<link href=’http://www.URL.com/favicon.ico’ rel=’icon’/>
Above http://www.URL.com is the web address or location where your favicon is stored (hosted).
‘favicon.ico’ is the name of your favicon file. You can use any name like myfavicon.ico and so on. After adding above code, update the http://www.URL.com and favicon.ico in the code. Then click on save template button. Open your blog and your new favicon should be visible in the address bar.
  1. Go to Blogger Dashboard > Template
  2. Click Edit HTML
  3. Hit Proceed button
  4. Now find for below code in your template
<title><data:blog.pageTitle/></title>

add below code immediately after of above code

<link rel="shortcut icon" href="URL OF YOUR ICON FILE"/>

Replace URL OF YOUR ICON FILE with your own icon.
Now save your template and you are done..
Suni

How to add authors to your Blogger blog

3 comments
As a blog writer there may be various reasons due to which you might be finding it difficult to post your blogs on regular basis. Whereas it is possible that there would be some writers who must be interested to post their blog on your blog column. In such situation it would be better to provide them an opportunity of posting their blogs on your blog. This will enable you to get connected with your potential readers but it will also provide fresh and interesting content to your readers. Other option is to get other writers engaged with you and develop your personal blog team. After which they will write a blog for you without disclosing their name in front of your potential readers. But do you know how to add contributors or authors to your blog in blogger.
Team blogs are quite useful when small groups of people wish to contribute to a single blog. 
Though this feature was already available in wordpress , recently Blogger too has enabled this feature. So now Blogger Users can have up to 100 multiple Authors or co-Authors for their blogs. So this new Team Blogging feature has enabled multiple authors to manage a single Blog. Although the owner of the blog will be the admin by default and all new authors he invites will be given co-author account. They can only EDIT their posts and they won’t have the feature to edit / delete others posts. However the admin can change the privileges of the co-authors anytime.

Need of additional contributors: 
The most common reason of involving more authors or contributors in your blog is that you might be interested in enhancing quality of your blog. 
 

Blog Administrators

An administrator of a team blog has access to the blog's settings and template, as well as the ability to edit and delete posts made by other members of the blog. Additionally, they can add or remove other team members. Any number of members can have admin rights on a single blog.

Adding Multiple Authors to Blogger Blogs

In this tutorial, I will explain how to Add more co-authors or guest authors to your Blogger Blog. Just follow these simple steps to enable this feature in Blogger.
  • Sign in to Blogger&nbsp
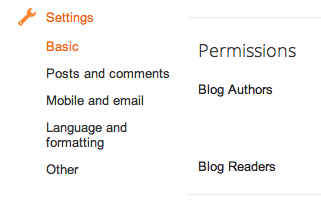
  • First, find the "Permissions" section under Settings | Basic.  Settings | Basic

  • Go to the Settings page of your blog. Click the link for Permissions.
  • Click the “Add Authors” button to add one or more new authors to the list of people who can write for your blog. posts   
Add authors      


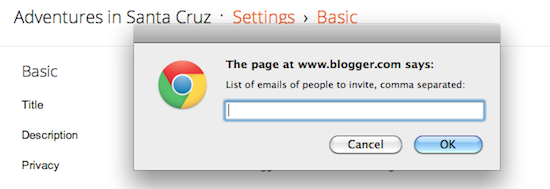
  •  Next, type the email addresses of the people you're inviting to the blog, separating each address with a comma. They'll receive an email with a confirmation link soon. Note that they must have Google Accounts, and if they don't already, they'll be prompted to create one.
    Add User 
  • When you are ready to send the invitations, click OK.

  • Blogger sends an email invitation to each person you listed in Step 4. If they agree to participate in writing the blog, they respond to the email affirmatively. Blogger does the rest for you.

Changing the permissions of the author

Once the author accepts your invitation , he can start writing in your blog. But he can only edit or delete posts written by him. He can’t delete posts written by others.
If you want anyone of the author to edit others post , then you need to grant him admin privileges. For granting Admin privileges , go to Settings page of your blog and navigate to Permissions sub-tab. Beside the author name you will see a button ” grant admin privileges “.
Pradeep Singh
Suni

How To Create A Contact Form on Blogger/Wordpress

8 comments
Every blog or website needs a contact form and this easy method, using Google Docs will work on any platform, be it Blogger, Wordpress or whatever you use.
 
In simple terms a contact form is the best way to get connected with your readers which facilitates them to get connected with you and post their comments regarding what they feel about your blog or something else they want to share with you. An interesting feature of contact form is that it is helpful in increasing fame of your blog, which can be witnessed from comments received on your blog. 
The more visitors your site gets, the more likely it is that you’ll encounter people who’ll be leaving comments or asking questions in the comment section of your post that completely have nothing to do with the subject at hand.

Basics things in a Contact Form: 
According to me every form should have some common information which is to be provided by every person who is  filling that form. Keeping that point in mind I decided to create a contact form with three necessary things, i.e., Name, Email Address and Message.

Creating a contact Form with Google Docs:

That is why it is always good idea to have a page dedicated to those kinds of reader feedback such as a ‘Contact Page’ or ‘Contact Form’. The process if fairly simple and doesn’t require you to have any solid knowledge in programming, and believe it or not, we will also be using Google Drive (formerly known as Google Docs) to accomplish this.
Step 1: Create the Contact Form 
  • Go to Google Docs -->                     
  • Click CREATE     
  • Click Form                                                                                                                                                                                                                                                                                                                                                                                                       
  •  You will get this screen:
  • You can give a name for this form, like "Contact Me" or "Contact Us"
  • Create questions, which will be the fields in the form. The four basic questions are: Name, Email, Website and Comments. Choose from the drop down menu the type of comment each question requires: Name and Email use "text" comments, and Comments are "paragraph text." You can choose which questions are mandatory(required).
  • Preview the form by clicking the link at the bottom.


Step 2: Get the html code

After you are satisfied, save and go to More Actions --> Embed.  Google will show you an html code to copy. Mine looks like this:


Step 3: Create Your Contact Page on Blogger
  • Go to your "Contact Me" page (or create one) on your blog. (Go to Posting --> Edit Pages). Open the "Edit HTML" tab and paste the code from Google Docs.
  • Preview how it will look on your blog. I had to adjust the width of the form to 600 pixels (In the code, you will see that Google Docs sets it at width="760." Fiddle with the number until the form fits within your page width).
  • Publish. My contact form looks like this:


Step 4: Make Sure You are Notified When Someone Uses the Form

When someone fills out the contact form, the information will go into the spreadsheet on your Google Docs form. Turn on email notification:
  • Go back to Google Docs and click on your form. A spreadsheet will open. Click Tools --> Notification Rules.
  • Check the box "a user submits a form" and "email-right away." Save.     You have done.                                                                                                        
Pradeep Singh
Suni